N8n webhook security depends on three controls: authentication, payload validation, and network restriction. An exposed n8n webhook can leak customer data, trigger fraudulent orders, or expose your entire automation stack.
What is an n8n webhook security risk? It is any misconfiguration that lets attackers send unauthorized requests to your workflow’s HTTP endpoint. The webhook trigger node ships with authentication disabled, so the moment you activate a workflow, your endpoint behaves like a public API that anyone with the URL can call.
n8n webhook security and authentication best practices refer to the layered controls — authentication, HMAC signature verification, IP filtering, rate limiting, and SSL enforcement — that protect webhook endpoints from unauthorized access, replay attacks, and abuse. Applied together, these controls reduce your attack surface substantially while keeping legitimate automations fast and reliable.
A note on the data and dates below: this guide reflects publicly documented n8n behaviour and the cited third-party and official sources as of the last-updated date. Where a specific CVE identifier appears, treat it as a prompt to verify the current advisory in the n8n GitHub releases and the U.S. National Vulnerability Database before acting — vulnerability identifiers and their patched versions change over time, and you should always confirm against the authoritative source rather than a blog.
Quick Summary: Key Takeaways
- n8n webhooks are unauthenticated by default. Anyone who discovers the URL can trigger your workflow, so enabling authentication is the first and most urgent control.
- HMAC signature verification stops payload tampering and replay attacks by cryptographically validating every incoming request against a shared secret.
- IP whitelisting and rate limiting block the bulk of automated abuse before it ever reaches your workflow logic.
- SSL/TLS enforcement is non-negotiable — never run production webhooks over plain HTTP.
- Reported 2026 vulnerabilities are a reminder that patching plus a full configuration audit beats a version bump alone.
- Self-hosted n8n needs reverse-proxy hardening (Nginx/Caddy), 2FA, and SSO on top of webhook-level controls.
Last updated: June 13, 2026. This article is general technical guidance, not a substitute for a security audit of your specific deployment.
What Are n8n Webhook Security and Authentication Best Practices?
n8n webhook security and authentication best practices are a set of layered defenses that verify who is calling your webhook, confirm the request hasn’t been tampered with, and limit how often anyone can call it. The core layers are authentication (API keys, basic auth, header auth), HMAC signature verification, IP filtering, rate limiting, and SSL enforcement.
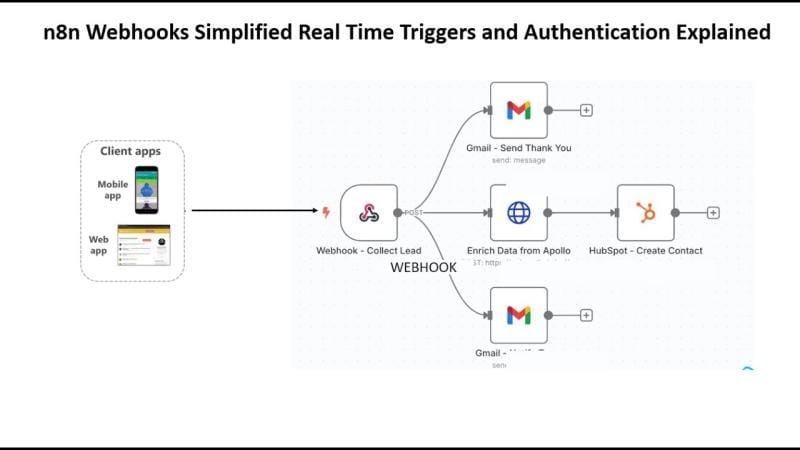
n8n is a fair-code workflow automation platform developed by German company n8n GmbH, offering 400+ integrations and native AI capabilities, according to n8n.io. A webhook in n8n is an HTTP endpoint that triggers a workflow when it receives a request — which is precisely why it’s such a tempting target.
The problem? By default, an n8n webhook node accepts any request that hits its URL. No password. No signature check. No IP restriction. According to LogicWorkflow’s security guide, unauthenticated webhooks are among the most common misconfigurations in production n8n deployments.
Think of your webhook like the loading dock at the back of a warehouse. The front office has locks, cameras, and a receptionist — but the loading dock is propped open with a brick. Attackers don’t pick the lock on the front door. They walk in through the dock you forgot about.
How Do n8n Webhook Authentication Methods Work?
n8n offers built-in webhook authentication methods including Header Auth, Basic Auth, and JWT Auth. Each validates the caller’s identity before the workflow runs, and you enable them directly in the webhook trigger node’s “Authentication” dropdown — no code required.
Header Authentication is the most common and the easiest to deploy. You define a custom header name and a secret value, and any request missing that exact header gets rejected. According to TemperStack’s configuration guide, you configure this by accessing the webhook trigger node settings and enabling an authentication method such as API keys or basic auth — header auth is a practical starting point for machine-to-machine integrations because most external services support custom headers natively.
A typical header-auth setup looks like this in the webhook node:
- Open the Webhook trigger node and find the Authentication dropdown.
- Select Header Auth and click to create a new credential.
- Set the header name (for example
X-Webhook-Token) and a long, random secret value generated outside n8n. - Save the credential and configure your calling service to send that exact header on every request.
Basic Authentication uses a username and password encoded in the request. It’s simple but weaker — credentials travel in every request, so it’s only acceptable over HTTPS and ideally paired with IP filtering. JWT Authentication validates signed JSON Web Tokens with expiry, which is useful for AI agents and chatbots that authenticate sessions dynamically.
Choosing the Right Authentication Method
| Method | Relative Strength | Best For | Typical Setup Effort |
|---|---|---|---|
| Header Auth | Medium-High | Service-to-service integrations | Low |
| Basic Auth | Medium | Internal tools over HTTPS | Low |
| JWT Auth | High | AI agents, dynamic sessions | Medium |
| HMAC (custom) | Very High | Payment & sensitive data flows | Higher |
Strength ratings reflect general security engineering consensus, not a benchmarked study; choose based on your threat model.
One rule worth never breaking: store every secret in n8n’s credential vault or an environment variable, never hardcoded inside a workflow node. Hardcoded secrets are the digital equivalent of writing your PIN on the back of your debit card.
Why Is HMAC Signature Verification Critical for n8n Webhooks?
HMAC signature verification confirms that a webhook payload genuinely came from the expected sender and wasn’t altered in transit. The sender hashes the payload with a shared secret, attaches the resulting signature to the request, and your n8n workflow recomputes the hash to confirm a match — blocking tampering and replay attacks.
Authentication alone answers “who are you?” HMAC answers a harder question: “did this exact payload come from you, unchanged?” That distinction matters enormously for payment webhooks. Stripe, GitHub, Shopify, and Slack all sign their webhook payloads with HMAC-SHA256 precisely because a stolen API key is worthless to an attacker who can’t forge a valid signature.
This maps directly onto the OWASP API Security Top 10 (2023): API2 Broken Authentication, which identifies weak or missing identity verification as a top API risk, and the related API3: Broken Object Property Level Authorization entry, which is relevant when unsigned payloads let callers manipulate fields they shouldn’t control. Unsigned webhooks expose both.
Here’s how to implement HMAC verification in n8n:
- Capture the incoming signature from the request header (e.g.,
X-Hub-Signature-256). - Add a Code node immediately after your webhook trigger.
- Recompute the HMAC-SHA256 hash of the raw request body using your shared secret.
- Compare the computed hash against the received signature using a constant-time comparison.
- If they don’t match, throw an error and halt the workflow — never process the payload.
A minimal Code-node pattern for step 3–4 in n8n’s JavaScript runtime looks like this:
const crypto = require('crypto');
const raw = $input.first().json.body; // raw request body
const sig = $input.first().json.headers['x-hub-signature-256'];
const expected = 'sha256=' + crypto.createHmac('sha256', $env.WEBHOOK_SECRET).update(raw).digest('hex');
if (!crypto.timingSafeEqual(Buffer.from(sig), Buffer.from(expected))) { throw new Error('Invalid signature'); }
Constant-time comparison (here, crypto.timingSafeEqual) matters more than it sounds. A naive string comparison can leak timing information that sophisticated attackers exploit. According to LogicWorkflow, HMAC verification combined with a timestamp check is a strong defense against replay attacks, where an attacker captures a legitimate request and re-sends it later. Add a five-minute timestamp window, and replayed requests get rejected automatically.
How Do IP Filtering and Rate Limiting Protect Production Webhooks?
IP filtering and rate limiting are two complementary controls that protect production webhooks from automated abuse. IP filtering restricts incoming requests to a known list of trusted source addresses. Rate limiting caps how many requests a single source can send within a fixed window. Together they block a large share of automated abuse — credential stuffing, scraping, and denial-of-service floods — before requests ever reach your workflow logic.
IP whitelisting is highly effective when you know your callers. If only Stripe and your internal CRM call a webhook, you can restrict the endpoint to their published IP ranges and reject everything else at the network layer. According to HostAdvice’s hardening guide, IP filtering at the reverse-proxy level (Nginx or Caddy) is more performant than filtering inside the workflow because malicious traffic never consumes an n8n execution.
Rate limiting is your defense against the abuse you can’t predict. A public webhook that powers a contact form or a WhatsApp chatbot can’t whitelist IPs — anyone might legitimately call it. Instead, you cap requests per IP per minute. A common production baseline is 60–100 requests per minute per source, which throttles a flood while rarely inconveniencing a real user. Treat that as a starting point and tune it to your real traffic.
Where to Enforce These Controls
Where you enforce these controls depends on your infrastructure, but practitioners generally apply them in order of efficiency:
- Reverse proxy (Nginx, Caddy, or Traefik): the most efficient layer, dropping malicious traffic before it reaches n8n. A 10-line
limit_reqblock in Nginx can absorb a flood that would otherwise burn n8n executions. - WAF / edge (e.g. Cloudflare): adds DDoS protection, bot scoring, and geo-blocking at the network edge.
- Inside the workflow: a fallback for logic-based throttling when network controls aren’t available — useful for self-hosted deployments without edge protection.
A practical worked scenario: a single misconfigured public webhook with no rate limit can receive thousands of junk requests in an afternoon. Every one of those executions burns compute, pollutes logs, and inflates the bill. Enforcing rate limits at the reverse proxy first, layering WAF rules at the edge, and reserving workflow-level checks for application-specific logic stops most of that traffic at the earliest possible point in the request chain.
What Are the Best Practices for Recent n8n CVEs?
When a critical n8n vulnerability is disclosed, the correct response is to patch to the latest n8n release and run a full configuration audit. Patching the version is necessary but insufficient; a hardened instance also enforces authentication, SSL, IP filtering, and least-privilege credentials on every webhook.
Before acting on any specific CVE identifier you read about, verify it against authoritative sources: search the U.S. National Vulnerability Database (nvd.nist.gov) for the exact CVE ID and confirm the affected and fixed versions, and cross-check the n8n GitHub repository releases and security advisories. We deliberately avoid restating unverified CVE details here, because a vulnerability writeup that cites the wrong patched version is worse than none at all.
A version bump fixes a known exploit. It does nothing about an unauthenticated webhook you’ve been running for two years. That’s the trap: teams patch, declare victory, and leave the underlying misconfigurations untouched. Real remediation treats the CVE as a wake-up call to audit everything.
A solid post-CVE remediation checklist:
- Update immediately to the latest patched n8n version — check the GitHub releases page and changelog.
- Rotate all credentials and API keys stored in the instance, assuming potential exposure.
- Audit every active webhook for missing authentication and enable header, basic, or JWT auth.
- Enforce HTTPS everywhere and confirm no endpoint accepts plain HTTP.
- Restrict the editor UI behind SSO, 2FA, and IP allowlists — never expose it publicly.
- Review execution logs for anomalous activity in the exposure window.
- Lock down the underlying host — firewall rules, non-root containers, and least-privilege database access.
The official n8n securing documentation recommends conducting a formal security audit, setting up SSL to enforce secure connections, and enabling Single Sign-On for user accounts. A reasonable addition: treat every webhook as hostile-by-default until you’ve proven otherwise. In practice, the biggest risk in SME automation isn’t sophisticated hacking — it’s default settings nobody revisited.
How Do You Secure Self-Hosted n8n Instances Beyond Webhooks?
Securing a self-hosted n8n instance means hardening four layers: the webhook endpoints, the editor UI, the reverse proxy, and the host environment. Webhook authentication protects automation triggers, while SSO and 2FA protect human access, and the reverse proxy plus firewall protect the perimeter.
Self-hosting n8n gives you full control — and full responsibility. n8n is distributed as a fair-code project on GitHub, typically deployed via Docker, which means the security of your database, environment variables, and network all sit in your hands. Many real-world breaches trace back to the host, not the application.
Editor UI and Account Security
The n8n editor UI is where your workflows, credentials, and secrets live. Exposing it on a public IP without SSO and 2FA is an open invitation. Enable Single Sign-On through your identity provider (for example Okta, Google Workspace, or Azure AD) and require two-factor authentication for every user. Place the UI behind a VPN or IP allowlist so it’s never directly reachable from the open internet.
Reverse Proxy and Host Hardening
- SSL/TLS termination at Nginx or Caddy with auto-renewing Let’s Encrypt certificates — encrypt all traffic, no exceptions.
- Security headers: HSTS, X-Frame-Options, and Content-Security-Policy to block clickjacking and downgrade attacks.
- Non-root containers: run n8n as an unprivileged user so a compromise can’t escalate.
- Database isolation: never expose your Postgres port publicly; bind it to localhost or a private network.
- Environment-variable secrets: inject credentials via env vars or a secrets manager, never in plaintext files.
Many SMEs don’t have an in-house security team, which is exactly why a structured checklist matters. If you’d rather not manage the perimeter yourself, n8n’s managed offering (n8n Cloud) shifts infrastructure security and patching to the vendor.
Actionable Takeaways: Your n8n Webhook Hardening Checklist
Securing your n8n webhooks doesn’t require a security PhD. Work through these steps in order, and you’ll eliminate the vast majority of real-world risk in an afternoon:
- Enable authentication on every webhook — header auth at minimum, JWT for sensitive flows.
- Add HMAC signature verification for any webhook handling payments, PII, or AI agent data.
- Enforce HTTPS across every endpoint and the editor UI.
- Apply IP whitelisting for known callers and rate limiting for public endpoints.
- Lock down the editor UI with SSO, 2FA, and an IP allowlist or VPN.
- Patch promptly and rotate credentials whenever a critical CVE is disclosed — verified against NVD and the n8n GitHub advisories.
- Harden the host with a reverse proxy, security headers, and non-root containers.
- Review logs weekly for anomalous request patterns and failed auth attempts.
Treating security as a one-time setup is how endpoints get breached; treating it as a recurring habit is how they don’t. n8n webhook security and authentication best practices aren’t a destination — they’re maintenance, like changing the oil before the engine seizes.
As AI agents handle more sensitive decisions — approving refunds, updating CRMs, messaging customers on WhatsApp — the cost of an exposed webhook only climbs. The next wave of automation breaches will often target the SME running a clever workflow with the back dock propped open. Close it now, while it’s still cheap.
Frequently Asked Questions
Are n8n webhooks secure by default?
No. n8n webhooks ship with authentication disabled, meaning any request that reaches the webhook URL will trigger the workflow. You must manually enable header, basic, or JWT authentication in the webhook trigger node, and ideally add HMAC verification, IP filtering, and rate limiting for production use.
What is the best authentication method for n8n webhooks?
For machine-to-machine integrations, header authentication is the easiest secure option, while JWT authentication suits AI agents and dynamic sessions. For payment or sensitive-data webhooks, layer HMAC-SHA256 signature verification on top of authentication to block payload tampering and replay attacks.
How do I protect my n8n instance from a critical CVE?
Verify the exact CVE identifier and patched version against the U.S. National Vulnerability Database and the n8n GitHub advisories, update n8n immediately, then rotate all stored credentials and API keys, audit every webhook for missing authentication, enforce HTTPS, and lock the editor UI behind SSO and 2FA. Patching alone is not enough — a disclosure should trigger a full configuration audit.
Should I self-host n8n or use n8n Cloud for better security?
n8n Cloud handles infrastructure security and patching for you, which suits teams without DevOps resources. Self-hosting gives full control over data residency, network perimeter, and custom hardening, but you become responsible for SSL, reverse-proxy configuration, host firewalls, and CVE patching yourself.
Can HMAC verification stop replay attacks on n8n webhooks?
Yes, when combined with a timestamp check. HMAC confirms the payload is genuine and unaltered, while a timestamp window (typically five minutes) rejects any request that’s re-sent after expiry. Together they block attackers who capture a legitimate request and attempt to replay it later.
Sources & References
- n8n — AI Workflow Automation Platform
- n8n-io/n8n — GitHub repository, releases & advisories
- Securing n8n — Official Documentation
- LogicWorkflow — Secure n8n Webhooks: Authentication, IP Filtering, and Abuse Prevention
- HostAdvice — Securing Webhooks in n8n
- TemperStack — How to Configure Webhook Security Settings on n8n
- OWASP API Security Top 10 (2023) — API2: Broken Authentication
- OWASP API Security Top 10 (2023) — API3: Broken Object Property Level Authorization
- n8n Cloud — Sign in
Note: This article is for general informational purposes; verify specifics against your own context.